Selection Profile Set-up
Selection Profile
If you have an account with the option to download on 2BA and are logged in to the management environment https://my.2ba.nl, go to [Mijn selectprofielen] (My selection profiles) in the [Download] menu.
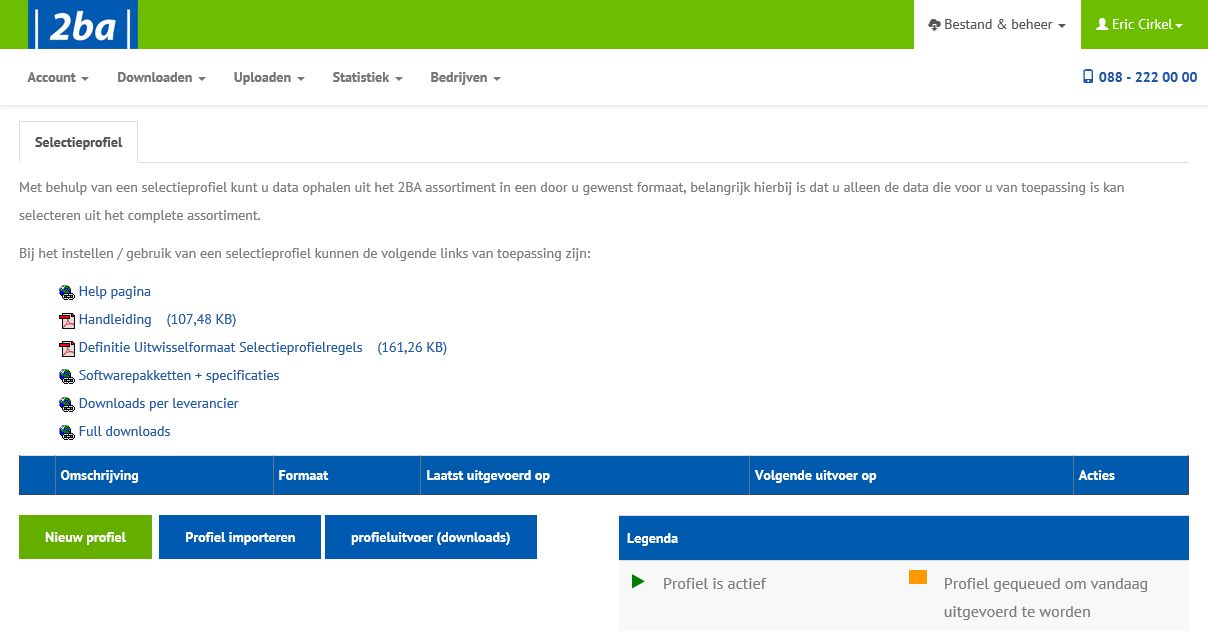
Note: Accounts with the superuser role have an additional option within the [Mijn bedrijf] (My company) menu, namely [Selectieprofielen] (Selection profiles). This option provides a list of all selection profiles within the company.
Creating a new selection profile
- Click on ‘Nieuw profiel’(New profile).
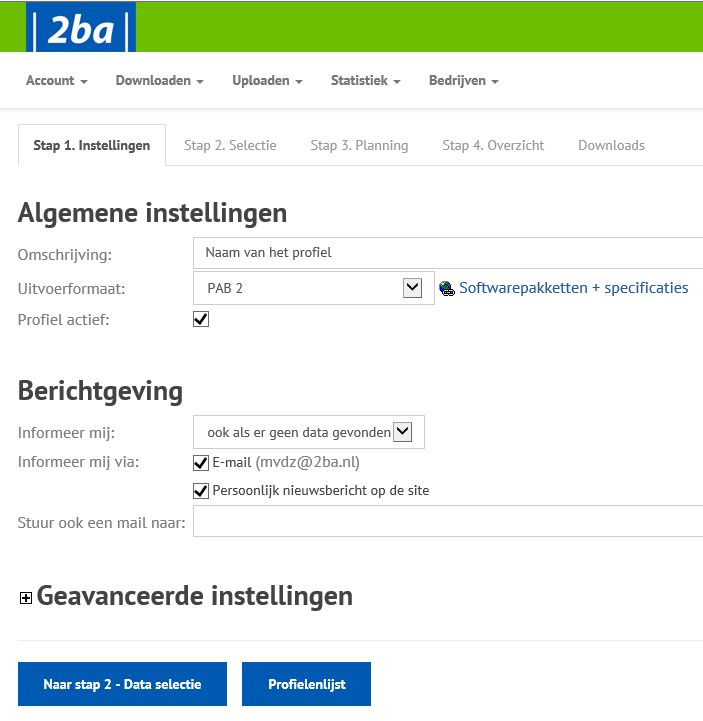
Step 1a: Algemene instellingen (General settings)
- Select the general settings that should apply to the profile:
- Omschrijving (Description):
Free name of your choice. - Uitvoerformaat (Output format):
Choice of output format PAB or GS1 XML Inst & Build XML. The selection of the output format should correspond to a format supported by your software package. If in doubt, please contact your software supplier or 2BA. - Actief/inactief (Active/inactive – tick):
Allows you to switch the profile on/off.
Step 1b: Berichtgeving (Reporting)
- Choose how you want to be kept informed:
- Informeer mij (Please inform me):
Only if there is data and/or also if no data is found. - Informeer mij via (Please inform me by):
You can indicate that you wish to be informed by e-mail, news message (also personal) or both options. - Stuur ook een e-mail naar (Also send an email to):
If necessary, enter one or more email addresses (separated by a semicolon ‘;’) to which a copy of the email should be sent.
Step 1c: Geavanceerde instellingen (Advanced settings)
- The default settings of the advanced options are usually sufficient.
- If you have problems downloading files with ‘.exe’ extensions, please choose the output file type ‘.zip’.
- Export ArtToKo can be switched off (not with PAB 2.00).
- You can choose not to select any product data.
- Go to Step 2 – Data selection
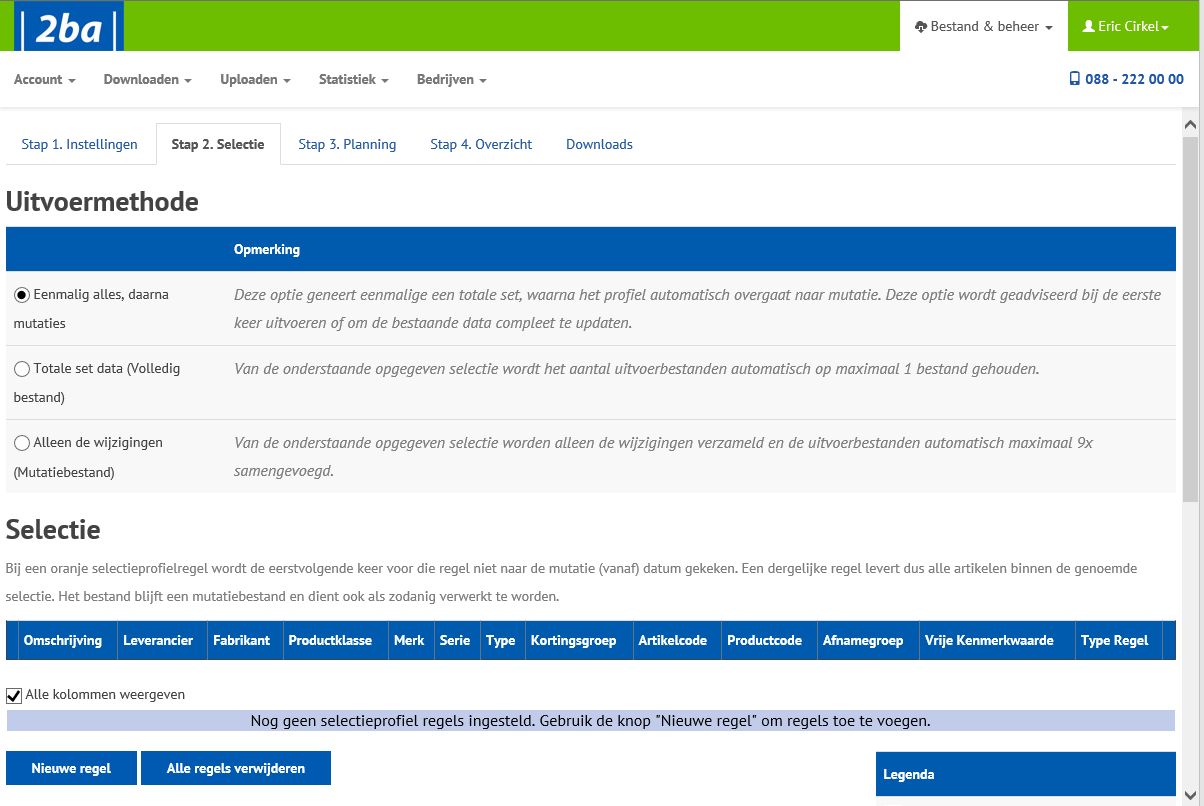
Step 2a: Selectie (Selection)
- Once you have set everything up, you will find here what we call the selection lines, each containing the supplier, the filter settings and the output method:
- Eenmalig alles, daarna mutaties (Everything once, then mutations)
This option generates a total set once, after which the profile automatically switches to mutation. This option is recommended for the first time running or to completely update the existing data.. - Totale set data (volledig bestand) (Total data set, full file)
Every time the selection profile runs, it provides a complete set of data with all the current records of the respective supplier.
Please note that this can be time-consuming for your system. - Alleen de wijzigingen (mutatiebestand) (Only the changes, mutation file)
With these green lines, only the changes are collected and the output files are automatically merged up to 9 times. - Notes:
An orange line is a selection profile line which is almost the same as a ‘Total data set’ and additionally has all known deleted records. This is often necessary to correct ‘old’ records or to fill new systems completely. This orange line is executed once after which it automatically changes to a green line (the normal mutation profile line) and collects all changed records from date x to date y. - Clicking on the ‘Nieuwe regel’ (New line) button takes you to the ‘Selectieprofielregel instellen’ (Set selection profile line) screen.
Step 2b: Selectieprofiel regel instellen (Set selection profile line)
- In this screen you can indicate what items must comply with in order to be included in your selection profile
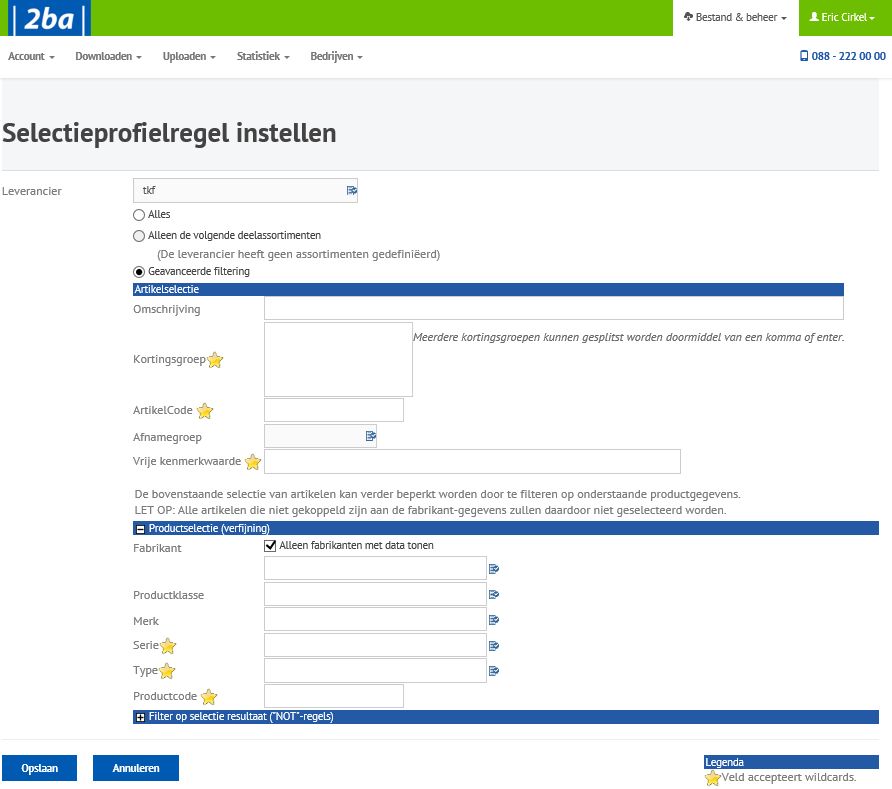
- Leverancier (Supplier):
In the box ‘leverancier’ (supplier) you can indicate from which supplier you want the data. 2BA will (after entering some initial letters) give you a list of available suppliers, from which you can choose.
By default, only suppliers with data are shown in the list. If there is a supplier who will be delivering in the future and someone wants to create a profile rule now, this can be done by unchecking the checkbox. Now you can also select suppliers for whom no data is available ‘yet’. - Alles (All):
Choose this option if you wish to receive all available item and/or product data and click on ‘Opslaan’ (Save). - In the ‘merk’ (brand) box, you can indicate which brand an item must be from to be included in your selection. Here, too, you can enter the initial letters of the brand, after which 2BA will offer you a number of available brands. (Please note that if you select a brand that does not appear in a supplier’s list, there will be no result).
- If required, a discount group and/or an item code can be entered.
- At least one of the following fields must be present per selection line: ‘Leverancier’ (Supplier), ‘Merk’ (Brand), ‘Kortingsgroep’ (Discount Group) or ‘ArtikelCode’ (Item Code), must be filled in.
- By clicking on the ‘Opslaan’ (Save) button, the line is added (the profile will be saved on the 2BA server). If you wish to refrain from adding the line, you can use the ‘Annuleren’ (Cancel) button.
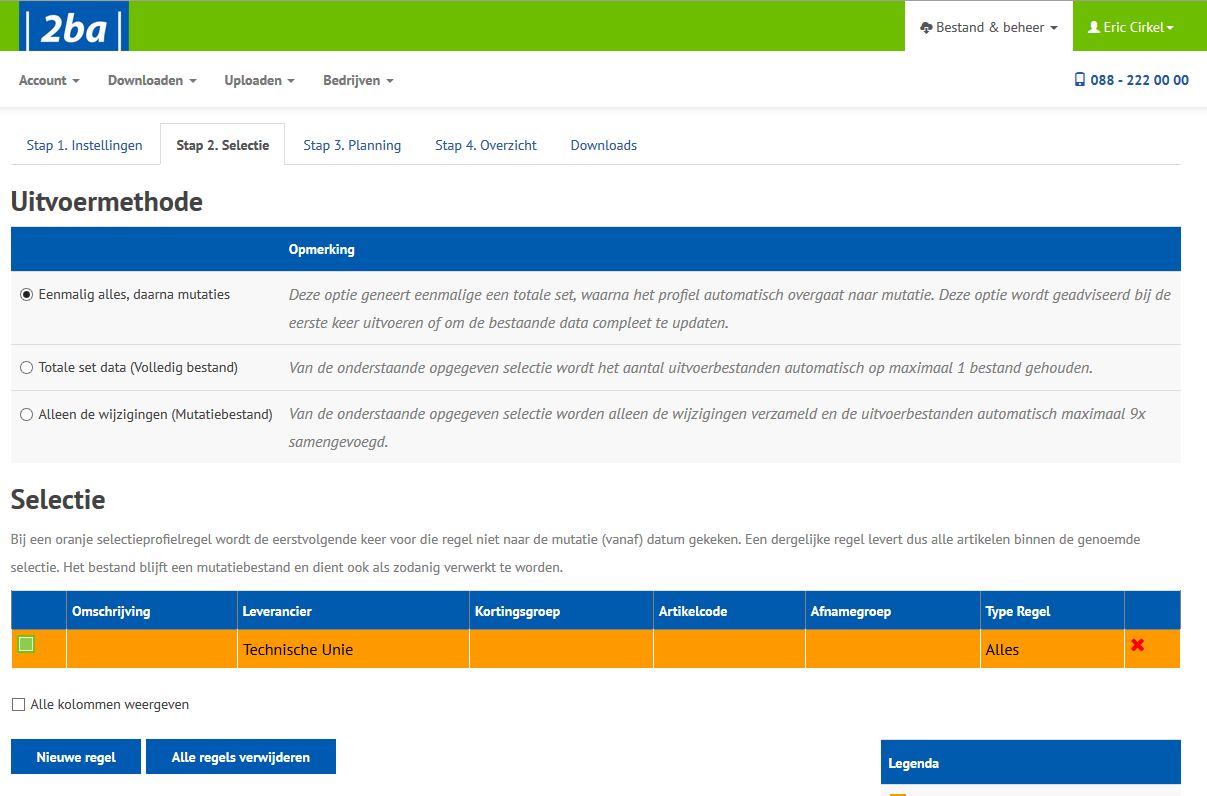
- In the case of an orange line, the last mutation date is not considered (once only), but all records are collected.
- When a new line is entered, it is automatically created as a complete mutation file (orange line), which collects all the data; after the first output, the line is automatically changed back to mutations (green line).
- Go to Step 3 – Planning
Step 3: Planning
- There are 3 options as an output pattern. When choosing the complete set, the repeat schedule will disappear and only the date of first execution will apply. In the other two options, you can use the repeat scheduler to set the repetition of your profile.
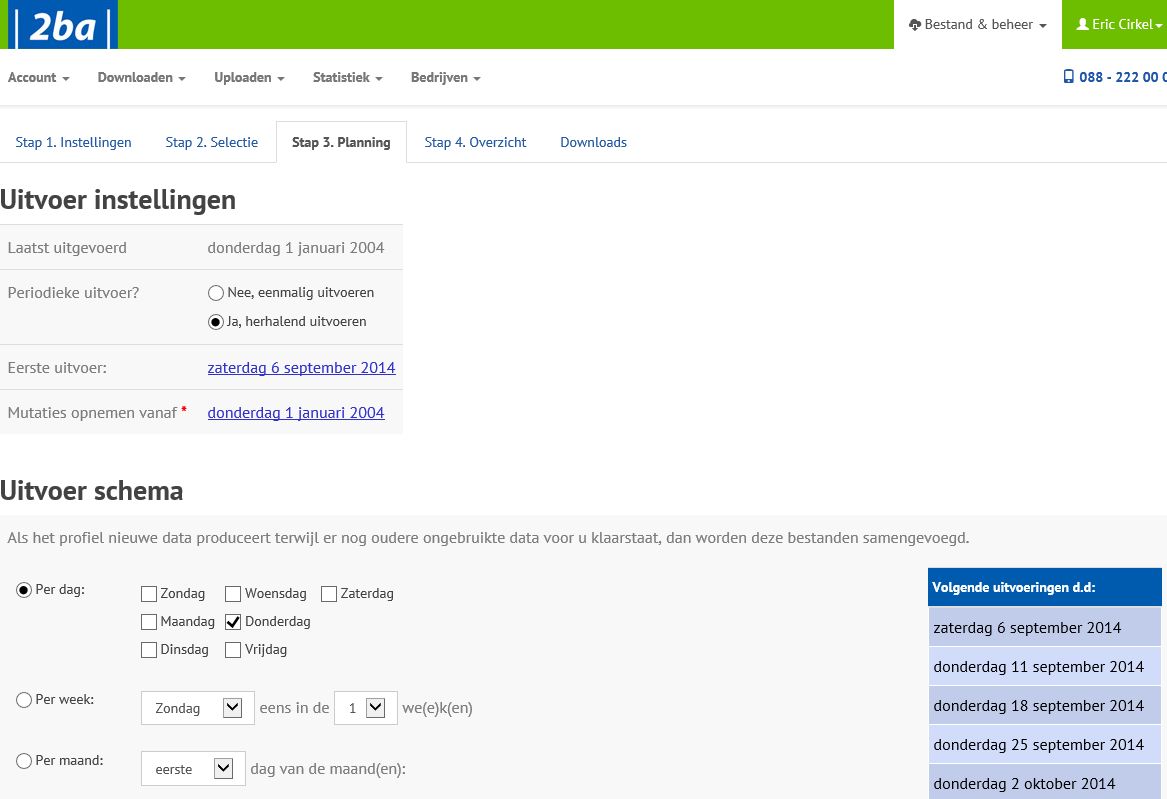
- With the option ‘mutations from’ you can choose the date. As soon as your selection profile is executed, this date will automatically be moved forward, which ensures that you always receive the changes from the intervening period. With a new profile, this date is set to January 1, 2004, which means that the first time you run it, you will receive everything from your selection, because all data on/after January 1, 2004, is reloaded in 2BA. If you have missed the changes of a period, for example because your profile was switched off for a period, you can adjust this date to the date on which you received the last changes.
- Immediately after making changes in the replay schedule, you will see on the right a list of the dates on which your selection profile would be carried out.
Notes:
- Do not forget to save your changes.
- By default, a selection profile is carried out at night.
- A selection profile will be disabled after 3 executions if the output files are not deleted..
Other possibilities
- The output files already created can be downloaded through the ‘Downloads’ tab. In addition, you can delete unused or files already downloaded here. You can see your profile list in the menu Downloaden/Mijn selectieprofielen (Download/My selection profiles), click on a profile and the tab ‘Downloads’. Here you will see all the downloads of the selection profile concerned.
- Filter by means of what are known as NOT rules:
Selection profile NOT rules are similar to normal selection profile rules. Whereas a normal selection profile rule can select data, a NOT rule will filter the found items from the end result. Read more about the Selection profile NOT rules - The selection (selection profile lines) can be provided through a text file if required. A description of this text file can be found by pressing the ‘Upload selection’ button: do this as follows:
- Choose the selection profile for which you want to add the rules
- Choose the ‘Selectie’ (Selection) tab
- Click on the ‘Selectie uploaden’ (Upload selection) button
- Use the ‘Browse…’ button to search for the file containing the selection profile rules
- Select ‘Uploaden’ (Upload)


